Voicemail
To access Message Settings
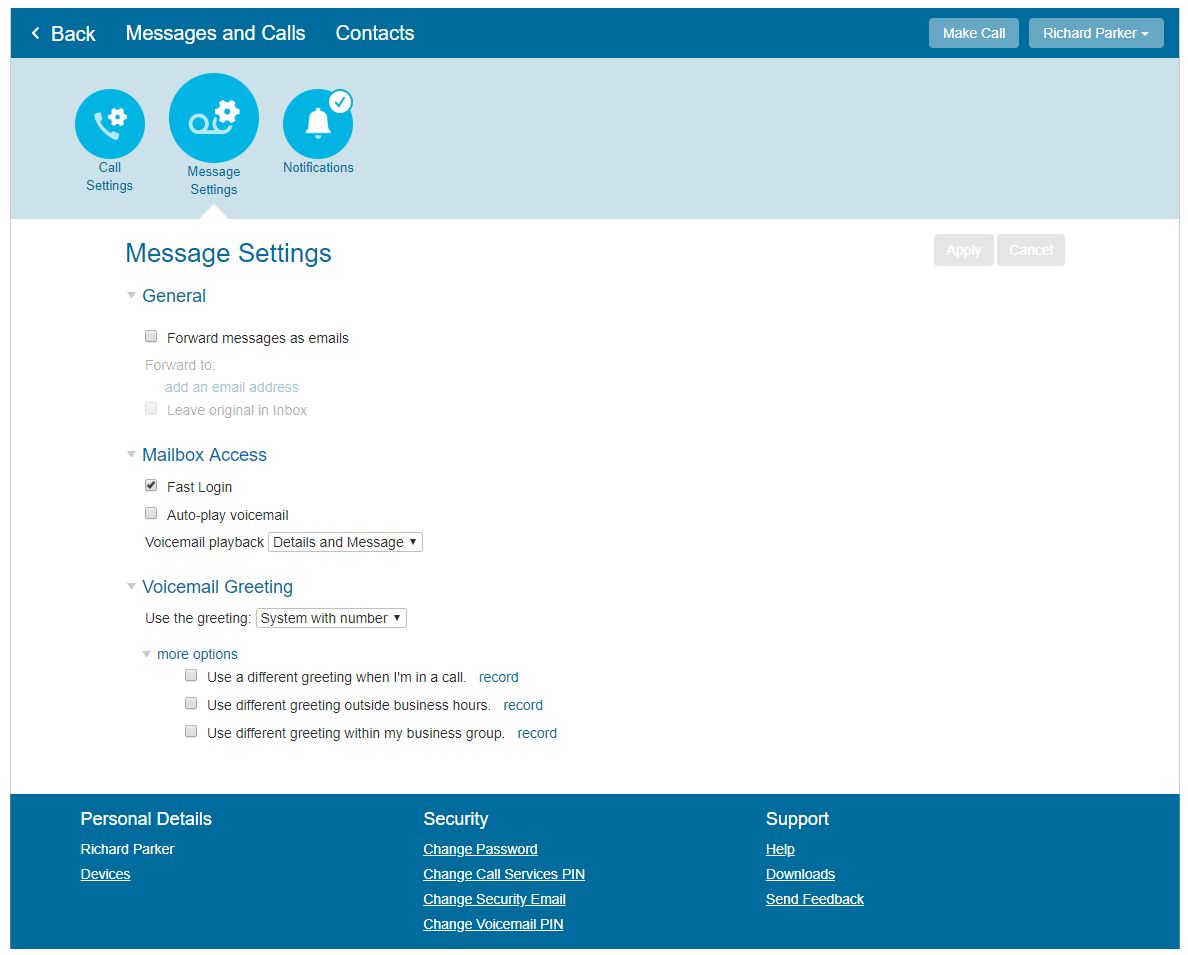
On the Home dashboard under Your Services, click Message Settings. Various message setting options including email voice messages, mailbox access and voicemail greeting options are displayed.
To automatically forward all received voicemails to your email
- On the Home dashboard under Your Services, click Message Settings.
- In the General section, check the box to Forward messages as emails. Click the add an email address link.
- Enter the email address where you’d like to receive voicemails, and click Add.
- If you’d like to leave messages in your CommPortal inbox so you can still access them, check the box for Leave original in Inbox.
- Click Apply to save your changes.
To configure message waiting indicator settings
If your handset supports message waiting indicators, you can configure them here. Depending on your handset, the notification will either flash a light on the handset, display a notification icon on the screen and/or signal a message with a sound or vibration.
- On the Home dashboard under Your Services, click Notifications.
- If not already expanded, click Message Waiting Indicator. Your current settings will display – and some may exist already due to set up by your administrator or Midco.
- If you wish, set up notifications to go to a handset. Repeat these steps for each number you want notified.
- Check the box for Send phone notification of incoming messages to the following phone numbers.
- Click New Entry, enter the seven or 10-digit number and click Add.
- Check the boxes for what types of notifications you want:
- Urgent Voicemail: voice messages marked as urgent (A caller can indicate a message is urgent by choosing an option after they record their message.)
- All Voicemail: all voice messages left for your number
- Click Apply to save your changes.
To remove a number/handset from this list, simply click the X next to that number.
To enable Fast Voicemail Login
Although you cannot skip a PIN entry to access your voicemail via your phone (for security purposes), you can enable Fast Login.
- On the Home dashboard under Your Services, click Message Settings.
- In the Mailbox Access section, check the box for Fast Login.
- Click Apply to save your changes.
- The next time you access your voicemail from your phone, the system automatically recognizes your number. Enter your voicemail PIN when prompted, and follow the voice instructions to manage your voicemail.
To enable auto-play voicemail
With automatic voicemail playback (auto-play voicemail), you can skip the main menu when you access your mailbox from your phone.
- On the Home dashboard under Your Services, click Message Settings.
- In the Mailbox Access section, check the box for Auto-play voicemail.
- Click Apply to save changes.
- The next time you access your voicemail from your phone, you will skip the main menu and your voicemail messages will play immediately.
To modify your voicemail details playback options
Determine how much detail you want to hear when you access your mailbox from your phone.
- On the Home dashboard under Your Services, click Message Settings.
- In the Mailbox Access section, go to Voicemail playback. From the dropdown box, select one of these options:
- Details and Message: caller who left the message, when it was left and the message itself
- Message only: only the recorded voice message
- Details only: caller who left the message and when it was left
- Click Apply to save your changes.
The next time you access your voicemail from your phone, the message playback will match your selection.
To receive voicemails via email
Also referred to as eVOICE, this feature enables you to receive an email to your specified email address whenever you receive a voicemail. This email will contain an audio file you can play back on your computer or device to listen to the voice message.
- On the Home dashboard under Your Services, click Notifications.
- If not already expanded, click Email. Your current settings will display – and some may exist already due to set up by your administrator or Midco.
- If you wish, set up voicemail messages to go to an email inbox. Repeat these steps for each email you want notified.
- Check the box for Send phone notification of incoming messages to the following addresses.
- Click New Entry, enter the email address, and click Add.
- Check the boxes for what types of notifications you want:
- Urgent Voicemail: voice messages marked as urgent (A caller can indicate a message is urgent by choosing an option after they record their message.)
- All Voicemail: all voice messages left for your number
- Click Apply to save your changes.
To remove an email address from this list, simply click the X next to that email address.
To set an extended absense greeting
Record and use this personal greeting and options when you’re out of the office. This option also allows you to use a different greeting to callers within your business group – in addition to letting callers leave a voice message.
- On the Home dashboard under Your Services, click Message Settings.
- In the Mailbox Access section, go to Voicemail Greeting, and choose Extended Absence.
- Next to Extended Absence, click the record link to record a new greeting. Greetings with an asterisk (*) symbol next to them are already recorded.
- Choose Record/Listen Greeting or Upload Greeting.
- Refer to and follow the Recording Controls section for recording, upload and playback control details.
- Click the play button to play back your message to check that it has recorded or uploaded correctly.
- If you would like to re-record your message, click the record button again. This will overwrite your previous message.
- Click Save.
- Under Voicemail Greeting, click more options to expand and display additional greeting settings. If you wish, choose one or more of the following options:
- Allow callers to leave a message: Check this box to allow voice messages from callers. If you do not select this option, callers cannot leave you a voicemail so your mailbox will not fill up while you are away.
- Use different greeting within my business group: Check this box if you want to play a different message to colleagues in your business group while you’re on extended absence. Click the record link to create the greeting these callers will hear. Follow the steps outlined above for recording or uploading a new greeting.
- Click the record link next to any option you choose to create or upload the greeting these callers will hear.
- Refer to and follow the Recording Controls section for recording, upload and playback control details. Click Save when your recording changes are complete.
- Click Save and then Apply to save your changes.
To set a forward all calls greeting
Use this option if you’d like to record a special greeting when you’re on a call, you want to play a different greeting outside business hours or you’d like callers within your business group to hear a different message.
- On the Home dashboard under Your Services, click Message Settings.
- In the Mailbox Access section, go to Voicemail Greeting, and choose Forward All Calls.
- Next to Forward All Calls, click the record link to record a new greeting. Greetings with an asterisk (*) symbol next to them are already recorded.
- Choose Record/Listen Greeting or Upload Greeting.
- Refer to and follow the Recording Controls section for recording, upload and playback control details.
- Click the play button to play back your message to check that it has recorded or uploaded correctly.
- If there is a problem with the recording – such as you cannot hear the recording or it is very quiet – see the Greeting Troubleshooting dropdown below.
- If you would like to re-record your message, click the record button again. This will overwrite your previous message.
- Click Save.
- Under Voicemail Greeting, click more options to expand and display additional greeting settings. If you wish, choose one or more of the following options:
- Use a different greeting when I’m in a call: Check this box to enable a unique greeting when callers reach your voicemail when you’re on another call.
- Use a different greeting outside business hours: Check this box to play a different greeting if a caller reaches your voicemail based on the time of day they’re calling – such as outside business hours.
- Use different greeting within my business group: Check this box if you want to play a different message to colleagues in your business group while you’re on extended absence.
- Click the record link next to any option you choose to create or upload the greeting these callers will hear.
- Refer to and follow the Recording Controls section for recording, upload and playback control details. Click Save when your recording changes are complete.
- Click Apply to save your changes.
To set a personal greeting message
This is a custom, personal greeting you record or upload.
- On the Home dashboard under Your Services, click Message Settings.
- In the Mailbox Access section, go to Voicemail Greeting, and choose Personal.
- Next to Personal, click the record link to record a new greeting. Greetings with an asterisk (*) symbol next to them are already recorded.
- Choose Record/Listen Greeting or Upload Greeting.
- Refer to and follow the Recording Controls section for recording, upload and playback control details.
- Click the play button to play back your message to check that it has recorded or uploaded correctly.
- If you would like to re-record your message, click the record button again. This will overwrite your previous message.
- Click Save.
- Under Voicemail Greeting, click more options to expand and display additional greeting settings. If you wish, choose one or more of the following options:
- Use a different greeting when I’m in a call: Check this box to enable a unique greeting when callers reach your voicemail when you’re on another call.
- Use a different greeting outside business hours: Check this box to play a different greeting if a caller reaches your voicemail based on the time of day they’re calling – such as outside business hours.
- Use different greeting within my business group: Check this box if you want to play a different message to colleagues in your business group while you’re on extended absence.
- Click the record link next to any option you choose to create or upload the greeting these callers will hear.
- Refer to and follow the Recording Controls section for recording, upload and playback control details. Click Save when your recording changes are complete.
- Click Apply to save your changes.
To set a system-generated greeting that plays no identifying information
- On the Home dashboard under Your Services, click Message Settings.
- In the Mailbox Access section, go to Voicemail Greeting, and choose System.
- Click Apply to save your changes.
To set a system-generated voicemail greeting that plays your phone number
- On the Home dashboard under Your Services, click Message Settings.
- In the Mailbox Access section, go to Voicemail Greeting, and choose System with number.
- Under Voicemail Greeting, click more options to expand and display additional greeting settings. If you wish, choose one or more of the following options:
- Use a different greeting when I’m in a call: Check this box to enable a unique greeting when callers reach your voicemail when you’re on another call.
- Use a different greeting outside business hours: Check this box to play a different greeting if a caller reaches your voicemail based on the time of day they’re calling – such as outside business hours.
- Use different greeting within my business group: Check this box if you want to play a different message to colleagues in your business group while you’re on extended absence.
- Click the record link next to any option you choose to create or upload the greeting these callers will hear.
- Refer to and follow the Recording Controls section on page X for recording, upload and playback control details. Click Save when your recording changes are complete.
- Click Apply to save your changes.
To set a system-generated voicemail greeting that plays your name
- On the Home dashboard under Your Services, click Message Settings.
- In the Mailbox Access section, go to Voicemail Greeting, and choose System with name.
- Next to “System with name,” click the record link to record a new greeting. Greetings with an asterisk (*) symbol next to them are already recorded.
- Choose Record/Listen Greeting or Upload Greeting.
- Refer to and follow the Recording Controls section for recording, upload and playback control details.
- Click the play button to play back your message to check that it has recorded or uploaded correctly.
- If there is a problem with the recording – such as you cannot hear the recording or it is very quiet – see the Greeting Troubleshooting dropdown below.
- If you would like to re-record your message, click the record button again. This will overwrite your previous message.
- Click Save.
- Under Voicemail Greeting, click more options to expand and display additional greeting settings. If you wish, choose one or more of the following options:
- Use a different greeting when I’m in a call: Check this box to enable a unique greeting when callers reach your voicemail when you’re on another call.
- Use a different greeting outside business hours: Check this box to play a different greeting if a caller reaches your voicemail based on the time of day they’re calling – such as outside business hours.
- Use different greeting within my business group: Check this box if you want to play a different message to colleagues in your business group while you’re on extended absence.
- Click the record link next to any option you choose to create or upload the greeting these callers will hear.
- Refer to and follow the Recording Controls section for recording, upload and playback control details. Click Save when your recording changes are complete.
- Click Apply to save your changes.
I have recorded my message, but it is distorted during playback
The distortion could be caused by your microphone gain set too high. Reduce the gain by clicking the microphone button and moving the gain control nearer to the bottom.
I have recorded my message, but cannot hear anything when I play it back
- Check that you have recorded something. A recording shows the recording length (such as 0:01:35 for 1 minute and 35 seconds). If the current recording length is 0 or much lower than expected, then try recording your message again.
- Check that playback volume is turned up high enough. Volume can be adjusted using the volume slider described above.
- Try re-recording the message, and as you are recording, watch the microphone audio indicator lights on the player. If no lights appear, or only one or two appear, then check the following.
- Increase the gain of your microphone by clicking the microphone and moving the gain control slider nearer to the top end.
- Click the gear icon to open the Adobe Flash Player Settings. Make sure Allow is selected. Click the microphone icon at the bottom of this settings box and that the correct microphone is selected in the dropdown, and that the record volume is turned up.
- If you are using an external microphone, check that this is plugged in correctly. If this still doesn’t solve the problem, then it may be that your microphone has been muted by the operating system (such as Windows). Refer to your operating system help for further information.
- If several green lights appear consistently while recording your message, then it is likely that your message has recorded correctly and the problem is occurring during playback. If you are using external speakers, check that these are plugged in correctly and turned on. If this does not resolve the problem, then it may be that your speaker has been muted by the operating system (such as Windows). Refer to your operating system help for further information.
Video tutorials are available for some of the most common features in the CommPortal. Check them all out in our tutorial playlist.